 Thumb Ring Build-A-Long Using Dental Laboratory TechniquesThumb Ring Build-A-Long Using Dental Laboratory Techniques by Dr. Murat Özveri Pictures: Fuat Özveri English Translation: Akın Öğretici & Alper Akar
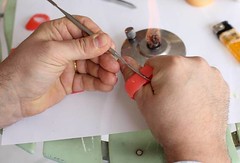
Thumb rings from Turkish, Mongolian, Korean, Persian and Byzantine archery traditions are not easily distinguishable. Yet, structural properties of the thumb rings differ according to culture and probably according to the shooting techniques as well. Along with organic materials as horn, bone and ivory, also less-valuable gems, valuable and invaluable metals were used to build them. While engravings and less-valuable gems were found on bronze ones, thumb rings made of valuable metals generally had decorations of inlay technique. When I took the road to revive the Turkish traditional archery in 2004, there was nobody in Turkey shooting with thumb release. While I was trying to learn Ottoman Turkish in order read old scripts, I also started to go through the works of the Western intellectuals who had long been interested in Ottoman Archery. The only problem – as in most of the cases – was the absence of a “master” who would lead my theoretical knowledge to practical experience. In Turkish and Iranian cultures this “master” figure is called “pîr”. Although the self-teaching was accepted, having a “master” to teach a particular art was much more preferable and admirable. Not having a master was a cause for humiliation. Even in modern Turkish there are expressions such as “nursuz pîrsiz” (meaning “without holy light/guidance and without a master”). There were some friends of mine, who did ease my painful transition from theory to practice. My conversations and discussions with Adam Karpowicz, who trained the first (and still the only accomplished) Turkish bowmaker of Republic era, Cem Dönmez; and with Bede Dwyer, who has been working on Turkish and Persian archery for over 30 years. Another important support was from my friends in Hungary, a country that had 30 years of experience in bringing their own traditional archery tradition back to life. Besides Dr. Gábor Szőllősy, I owe thanks to those who also used thumb release and shared their experiences with me: Dr. Jenö Major, Sandor Paku and Zoltán Forray. While discovering the secrets of thumb release, I was also trying to understand the morphology of the thumb ring. After numerous attempts at making thumb rings and suffering from wounds inflicted by those badly made ones, I began to understand the shooting technique as well as the structure of thumb rings. The thumb ring given by dear Sandor Paku as a gift and the one that Adam Karpowicz sent me all the way from Canada, enlightened my way and helped me to produce functional thumb rings myself. The method I used at this early stage has later proven to be quite acceptable and helped me make the thumb rings for colleagues who joined our group in following years. Due to my professional skills, my know-how and easy access to the material, I felt at ease with this method. I still prefer this method because it is both easy and forgiving. To summarize, this method is a “modelling+impression+molding the ring” process. Here is the explanation of the process;
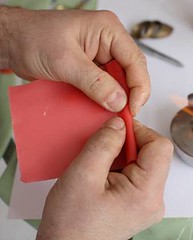
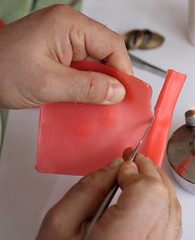
Blue modelling wax can also be used, however it melts at higher temperatures. It is also harder to make corrections on the model later on. It may also cause serious burns if it drops on your skin. The red/pink wax does not have the danger of causing serious burns, however it is easily deformed while held in hand or processed with the modelling spatula. Working on blue wax blocks requires saw, file and sandpaper, as with working on harder materials such as horn or bone. Despite its relatively harder texture it’s easier to process than these organic materials mentioned. It does not deform when held in hand, but it may break.
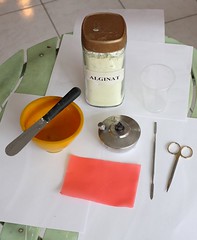
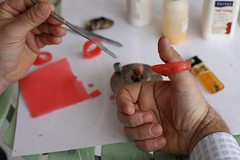
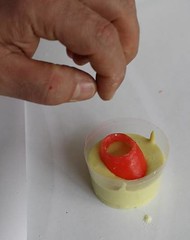
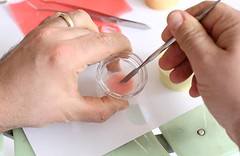
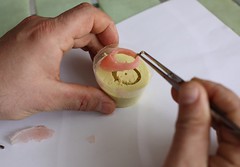
2- Getting the impression of your model: Dental impression materials are plastic materials that are applied to a particular model and take its shape. There are several options. The one I’d recommend here has a resonable price among the other dental impression materials. Even after it set (hardened) it is elastic enough to allow you to get your wax model out without being deformed. This material is commercially available in dental supply stores, under the name Alginate. It is a powdered hydrophobic material and is mixed with water to use. You will need a small plastic cup and a straight, flexible knife/spatula for mixing, but again I would recommend you to use an elastic “bowl” and a plaster spatula that you may get from dental supply stores for a fair price. These will help you a lot.
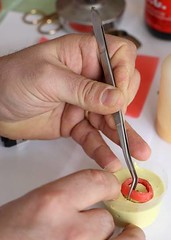
You should bury your wax model into the impression material before it is hardened. Bury it so well that only the upper edge is visible. All the surfaces of the wax model should be buried completely into the impression body. You can use the tip of your spatula to enhance the merging of the model. Then you need to softly tap the outer surface of the cup so that all the air bubbles in the mass get out. Both mixing the impression material homogenously and tapping are extremely important to avoid the porousity in the final mould. Otherwise the final mould –which will be your thumbring- may be porous, spongy and prone to break!
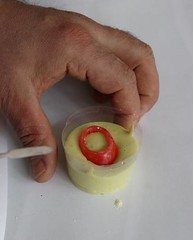
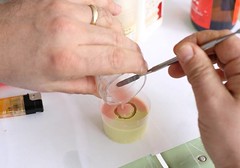
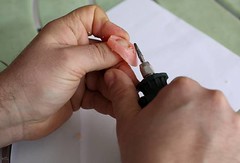
3- You have to wait for the Alginate to set and get harder before taking the wax model out. It takes 4-5 minutes for Alginate to harden, but it may take less in higher room temperatures or if mixed too watery. If you think that you may need more working time (the time you’ll spend in burying the model) you can mix Alginate with cold water. If Alginate is left for a long time after initial hardening, it dries up and shrinks. It has bad dimensional stability. For this reason you should slowly remove the wax model by holding it firmly with a pincer, while it’s still in an elastic and “wet” phase. You may check its hardness by slightly touching it.
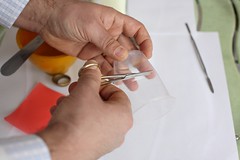
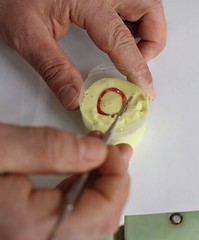
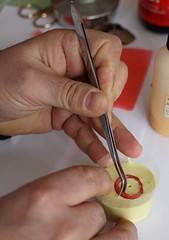
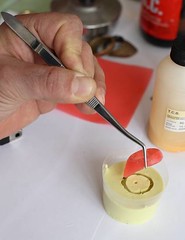
Now, you have the negative mold of a thumb ring custom made for your thumb, on an 1:1 scale. Whatever you fill the mold with, you will have the 1:1 copy of the model made from wax. You may take your wax model to a smelter, and you may ask him to cast it in bronze, brass or silver. Suppose you would like to have both silver and brass thumb rings, you may duplicate your model by filling in the negative mold again with melted red wax. When it hardened, remove it from the mold. Here you have two wax models to take to the smelter! If you want to have a thumb ring that you can finish on your own and spend considerably less than you will do for a metal one, you may fill this mold with a soft/liquid material that will set in and produce a thumb ring of acceptable, usable rigidity. The most convenient among dental materials that display such desired property are acryls.
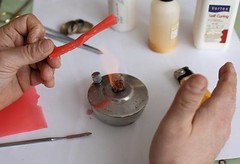
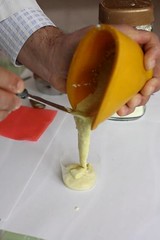
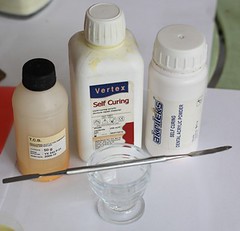
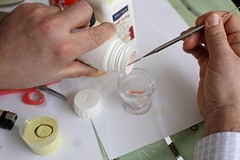
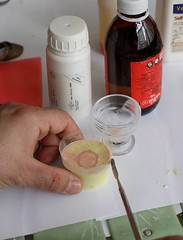
There are different kinds of dental acryls, those polimerize on their own (Self-cure or auto-polymerizing acryls) and those polymerize by applying heat. The self-cure acrylys are also called “denture repair acryls”. These are not as resistant to mechanical forces as the latter ones and do not provide a well-polishable surface, but they would make thumb rings that can safely be used with bows upto 60 lbs draw weight. Caution: According to the thumb ring type and to the thoughness of the material you use, the thickness of your wax model (and of course the final ring) will change. For a metal thumb ring, the thickness and the width of the ring will be less than that of an acrylic or horn thumb ring. Especially if you would like to cast a thumb ring from precious metals, unnecessary mass will harm your budget. Self-cure acryl is prepared by mixing powder and liquid components. The liquid has a very strong scent and is dangerous to inhale! Please work in a well-ventilated working place and use a protective mask. You should also avoid skin contact with the liquid. Wear latex gloves if possible, if not, wash your hands with plenty of soap and water after you finished the work. Mix the acryl in a small glass cup. Its density should be low to medium. If it’s too fluid the final outcome will be a fragile thumb ring. If it’s too dense it won’t fill the negative mold perfectly and there will be dents on the thumb ring. However, just like the modelling wax, acryl is also a forgiving material and you can easily fix imperfections. If the final cast has dents, you may mix some new acryl and make additions to complete it. The newly mixed acryl chemically bonds with the old one, it does not cause any problem in terms of durability.
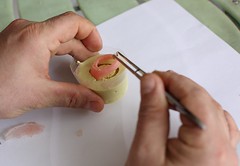
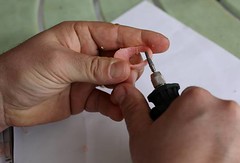
Color: Pink and white self-cure acryls are mostly used in making and repairing dentures. There are also acryls in different colors, but they’re usually polimerized by heating. You can add dry paints (by grating) in the liquid of pink or white repair acyrl to dye it. However the particles should be small and less in number. I have seen fractures in thumb rings when I dyed the acrylic carelessly with this method. It is also worth to mention that after a finishing and good polish, white acyrilic makes thumb rings that look like ivory or bone which is really elegant. Water soluble paint known as ‘aquarelle’ disolves completely into the acryl liquid and leave no particles inside the mix. 4- “Levelling” and Finishing the Thumb Ring: Depending on many parametres such as the precision of your wax model, to the density of the mixtures as well as the efficiency of your craftmanship, the acrylic thumb ring taken out from the alginate mass will be more or less rugged. If you proceeded through the stages well enough, finishing the final acrylic ring with a file and sandpaper may suffice. But rotary power tools (usually known by its brand name “Dremel”) are highly recommended. There are many affordable models with several tips and accessories. It will soon become your favorite tool in the toolbox. It may be wise to proceed the fine tuning with file and sandpaper after the rough work with the rotary instrument is completed.
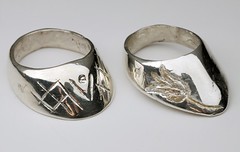
The two most important points in finishing of the thumb ring are: 1- The shape and the slope of the “eşik” (meaning “treshold”, is the ledge on which the string rests) 2- The fitting of your thumb! Eşik (pron. Ash-eek) is a minor flat surface which smoothly welds into ‘the palate’ (or “thumbpad”, the triangular extention of the ring) with an angle greater than 90o. The angle of the ‘eşik’ is so crucial that it has to be fine tuned with the help of a little file while the potential owner shoots the bow using it. Therefore, to acquire good fundamental skill as a beginner and to avoid painful injuries, the help of an expert is vital at this stage. Thumb rings must neither be too tight nor too loose. An important point that we should mention is that the thumb will get thicker with practice. Absorption or expulsion of water in human body due to seasonal changes is also a factor in the thumb’s thickness.
 |
|||||||||||||||||||||||||||||||||||||||||||